In order to get my hands on a low mass arm, I sorted a deal out with mi old man. The Goldring cart he now has needs a higher mass arm than the formula 4, and my AT150sa needs a lower mass arm than my unipivots or the rb251. I need 2 arms, one for the Lenco and one for the JBE. The mayware formula 4 is destined for the JBE dd deck as the 251 needs to stay on the Lenco demonstrator.
So that left me needing another arm that will suit the Goldring to complete the deal.
Enter the Rega R200.
I picked this up off Ebay needing a new bias belt and a complete rewire. The arm came with an Incognito loom, more on that later....... First, the bias belt needed attention.
If you read t'internet, this is apparently a complete pig of a job that needs 3 hands and a degree in something to do it. Well it doesn't. What it needs is a quiet environment, a set of basic tools, and patience.
Firstly, you need a belt. They are no longer available, so you may need to scour the web for a suitable replacement. I got one from ebay from a very knowledgable chap who also provided a set of comprehensive instructions on fitting it. the belt was longer than the original, but the chap who sold the kit has had a small half moon shaped tensioner piece laser cut from acrylic to provide the correct tension. It is a very well thought out kit, so thanks need to be given to him for it.
In order to fit the new one you need to be able to get at the old one. Or the remains of it. This will be alot easier if you remove the arm wand first by taking the vertical bearing pins out. Secure the yoke in a vice so its upside down, its easier to get the retaining nuts off the bottom of the bearing shaft if you do this as it stops the yoke turning. Use your common sense and put something relatively soft either side of the yoke so the jaws of the vice don't make a mess of it. To get at it you need to remove the bottom lateral bearing from the arm which is retained with a pair of locking nuts in the base of the arm post. First, there is a screw in collar with 2 set screws in it that needs removing. A set of mole grips will get this off. Then take out the 2 retaining nuts. Do this carefully as these 2 nuts are what preloads the ball race underneath them.
Remove them and you will see a floating ball race which you need to remove with tweezers and under this the actual bearing cage. Again remove with tweezers. DO NOT force any of these parts, finesse is your friend.
When you have done this, remove the 2 retaining screws underneath the bias outrigger to remove the outer of the post and the cover which is a one piece casting.
You will then be able to remove the remains of the belt and fit the new one and its tensioner. You will need to reset the bias to 0 first. Set the dial to 0, then turn the collar that moves the moving ring magnet so that the magnet is set so it is as far away from the fixed magnet as possible.
Then fit the belt, pull it away from the bias outrigger casting wall, and fit the tensioner piece in so it sticks to the inside wall of the the casting.
Refit the outrigger cover/ arm post, and stop. This is where the patience comes in. Drop the bearing cage in. Look at it first and you will see that one side is different to the other. One side has the face of each ball proud of the metal cage, and the other doesn't. It needs to be put in so that the ball faces are facing out, as the race needs to run on them. Drop the bearing cage in and seat it properly by poking it into the recess with a cocktail stick. Then drop the bottom race in, the groove in it rides on the balls in the bearing cage so this needs to be dropped over the shaft and wiggled into position so it seats properly on top of the bearing cage.
Then screw the retaining nuts in. just do them up lightly as they set the bearing preload. don't worry if there is wobble in the lateral bearing at this point.
Then refit the arm wand. It needs to be back on for the preload to be set correctly. You will feel lateral and a little vertical movement at this point.
Turn the bottom nuts until the movement is gone. You can see when it it right as setting the bias to 0.5 should start to slowly move the arm back to the rest when the preload is correct. So when you cant feel any movement and the bias pulls the arm back at 0.5g, you've got it.
I then added a blob of nail varnish to stop any movement in the retaining nuts.
Job done.
Rega R200 rebuild
-
Vinyl-ant
- Posts: 766
- Joined: Sat Jul 01, 2017 12:51 pm
- Location: South yorkshire
- Has thanked: 1 time
- Been thanked: 364 times
- Contact:

Rega R200 rebuild
Analogue: oracle delphi sme 309, jbe series 3 cx unipivot dv20x2l, roksan xerxes tabriz vm750, jvc ql-y5f rigb at440, jvc ql-y3f vm750, lenco 75, technics sl150
Phono stages: cole lcr, benedict audio hothead
Digital: cyrus cd7, wiim mini x2, topping e30, jds labs el dac 2+
Amplification: nelson pass b1, nelson pass f5
Speakers: 15" fane aperiodic wardrobes
Cans: myryad z40, hifiman sundara + deva, fostex t50rp, sennheiser momentum on ear +over ear, b&w p5 and p7
-
Vinyl-ant
- Posts: 766
- Joined: Sat Jul 01, 2017 12:51 pm
- Location: South yorkshire
- Has thanked: 1 time
- Been thanked: 364 times
- Contact:
Re: Rega R200 rebuild
Now onto the rewire.
I had an incognito loom with the arm which has cardas wire in it. Which I wasn't impressed with. At all.
So I made up and used my own wiring loom.
I used very thin copper litz wire, wired directly from the back of the headshell connector to the plugs.
I used the curved end of a 6" steel ruler to crack the headshell connector off after removing the retaining setscrew. The end fits into the 2 vertical cutouts that the headshell pin rides in and acts like a very wide screwdriver blade.
Took the wand back off and fed the wiring into the tube through the hole in the underside which is easier, as you don't have to faff about trying to grab the ends and pull them out, then soldered the loom to the connector pins, and sleeved the pins with the original sleeves.
Fed the loom through the lateral bearing tube, soldered a length of litz to the post sprung steel earthing pin, and soldered the armtube earth to the same place.
and we have something like this
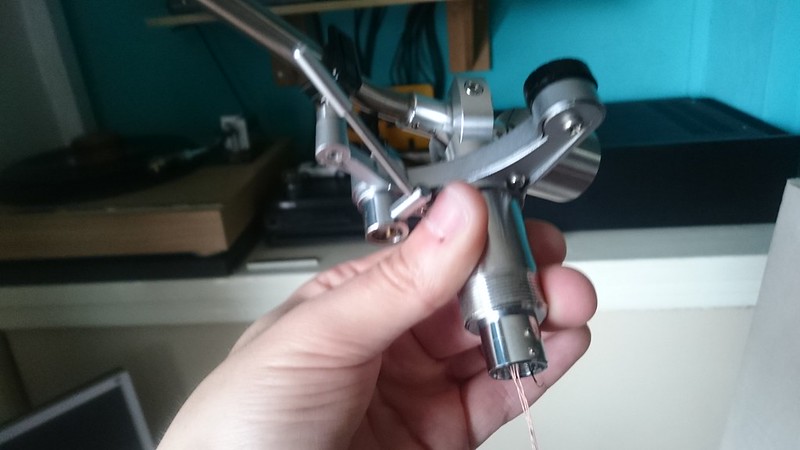 Rega r200 bias belt fix and rewire by anthony cresswell, on Flickr
Then reset the vertical bearings to the correct preload and you have this
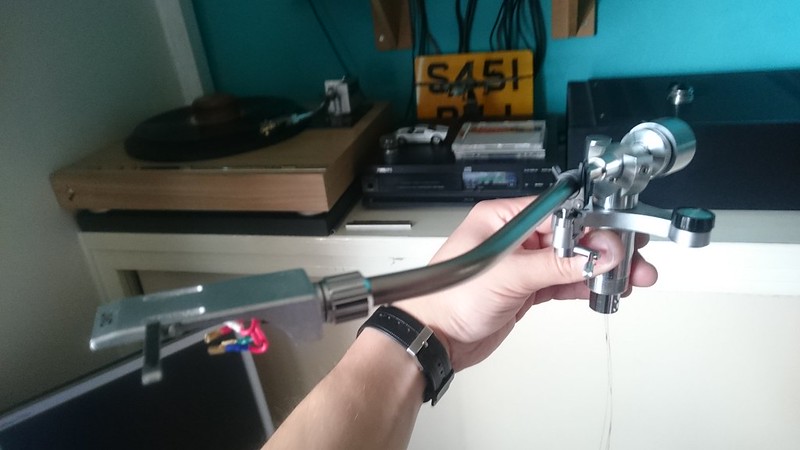 Rega r200 bias belt fix and rewire by anthony cresswell, on Flickr
Note the collar at the base of the arm post, this comes into its own later
I had an incognito loom with the arm which has cardas wire in it. Which I wasn't impressed with. At all.
So I made up and used my own wiring loom.
I used very thin copper litz wire, wired directly from the back of the headshell connector to the plugs.
I used the curved end of a 6" steel ruler to crack the headshell connector off after removing the retaining setscrew. The end fits into the 2 vertical cutouts that the headshell pin rides in and acts like a very wide screwdriver blade.
Took the wand back off and fed the wiring into the tube through the hole in the underside which is easier, as you don't have to faff about trying to grab the ends and pull them out, then soldered the loom to the connector pins, and sleeved the pins with the original sleeves.
Fed the loom through the lateral bearing tube, soldered a length of litz to the post sprung steel earthing pin, and soldered the armtube earth to the same place.
and we have something like this
Rega r200 bias belt fix and rewire by anthony cresswell, on FlickrThen reset the vertical bearings to the correct preload and you have this
Rega r200 bias belt fix and rewire by anthony cresswell, on FlickrNote the collar at the base of the arm post, this comes into its own later
Analogue: oracle delphi sme 309, jbe series 3 cx unipivot dv20x2l, roksan xerxes tabriz vm750, jvc ql-y5f rigb at440, jvc ql-y3f vm750, lenco 75, technics sl150
Phono stages: cole lcr, benedict audio hothead
Digital: cyrus cd7, wiim mini x2, topping e30, jds labs el dac 2+
Amplification: nelson pass b1, nelson pass f5
Speakers: 15" fane aperiodic wardrobes
Cans: myryad z40, hifiman sundara + deva, fostex t50rp, sennheiser momentum on ear +over ear, b&w p5 and p7
Phono stages: cole lcr, benedict audio hothead
Digital: cyrus cd7, wiim mini x2, topping e30, jds labs el dac 2+
Amplification: nelson pass b1, nelson pass f5
Speakers: 15" fane aperiodic wardrobes
Cans: myryad z40, hifiman sundara + deva, fostex t50rp, sennheiser momentum on ear +over ear, b&w p5 and p7
-
Vinyl-ant
- Posts: 766
- Joined: Sat Jul 01, 2017 12:51 pm
- Location: South yorkshire
- Has thanked: 1 time
- Been thanked: 364 times
- Contact:
Re: Rega R200 rebuild
So now we have a rebuilt, rewired, and reset arm with a load of wires hanging out of it.
We now need a usable outer loom. The next step was to find a way of retaining a sleeve for the wires, a braid for screening, and an outer braid for covering it up. So abit of lateral thinking later, and some measuring with the calipers and we have a solution.
The collar that screws into the base of the arm has an ID of 12mm, and I have a length of 1/2" dowel hanging around. So I cut a 3/4" length and drilled 2 holes in it. One down the centre to take the 4mm sleeve that the wiring runs through, and a 2mm one for the earth wire to run through. The sleeving was glued into the hole in the dowel with some hot melt glue. the wiring was threaded through the sleeve with about 4" left hanging out of the other end, and the earth wire was threaded through the other hole. A braid stripped out of some coax was put over the sleeve and soldered to the earth wire. The braid was then also hot melt glued to the 1/2" dowel. This was then put up into the threaded collar and secured in place with the setscrews. So we now had the beginnings of a screened cable.
The next thing was to sleeve over the braid with some plastic outer braid that was robbed from the incognito loom. The hot melt glue at the dowel end was heated back up with a lighter and the outer braid pressed into it to retain it, (yes I did burn myself.......) and then heatshrink was shrunk over the lot. Now nice and secure, it wont come apart without heat or being cut.
At the other end, a wire with a croc clip was soldered to the other end of the braid, this will clip to the phono stage and mean that the wiring is shielded from end to end. 2 lengths of sleeving were put over the 2 wires for left and the 2 wires for right, separated by putting a meter on the headshell leads as nothing is colour coded inside the loom. Some black nasty tape over the lot to secure it all at the plug end, and some more heatshrink completed that part. Solder on the plugs, and hey presto, a completely rebuilt, rewired, reset and rejuvenated Rega R200
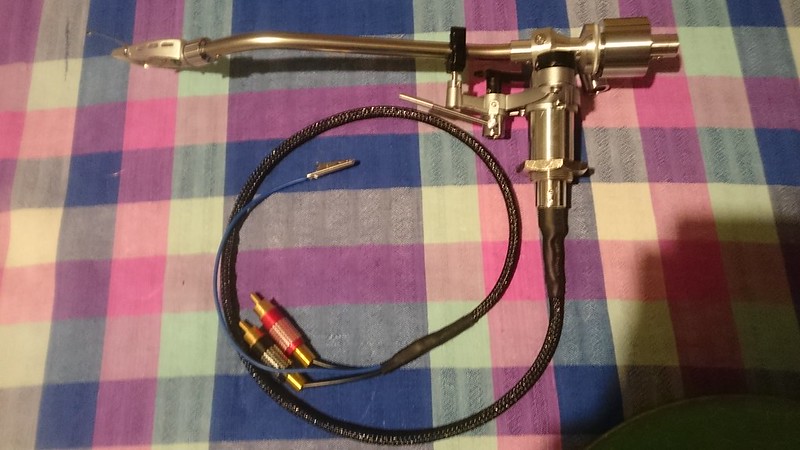 Rega r200 bias belt fix and rewire by anthony cresswell, on Flickr
Soon to be in its new home here
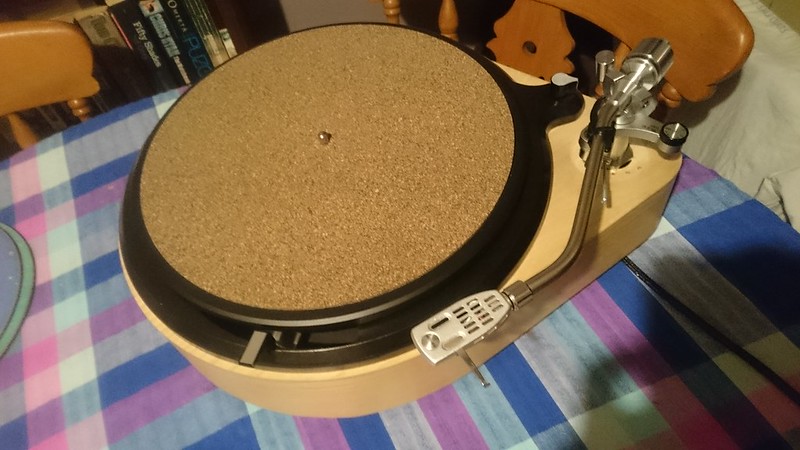 Rega r200 bias belt fix and rewire by anthony cresswell, on Flickr
And it doesn't even foul the on off switch
We now need a usable outer loom. The next step was to find a way of retaining a sleeve for the wires, a braid for screening, and an outer braid for covering it up. So abit of lateral thinking later, and some measuring with the calipers and we have a solution.
The collar that screws into the base of the arm has an ID of 12mm, and I have a length of 1/2" dowel hanging around. So I cut a 3/4" length and drilled 2 holes in it. One down the centre to take the 4mm sleeve that the wiring runs through, and a 2mm one for the earth wire to run through. The sleeving was glued into the hole in the dowel with some hot melt glue. the wiring was threaded through the sleeve with about 4" left hanging out of the other end, and the earth wire was threaded through the other hole. A braid stripped out of some coax was put over the sleeve and soldered to the earth wire. The braid was then also hot melt glued to the 1/2" dowel. This was then put up into the threaded collar and secured in place with the setscrews. So we now had the beginnings of a screened cable.
The next thing was to sleeve over the braid with some plastic outer braid that was robbed from the incognito loom. The hot melt glue at the dowel end was heated back up with a lighter and the outer braid pressed into it to retain it, (yes I did burn myself.......) and then heatshrink was shrunk over the lot. Now nice and secure, it wont come apart without heat or being cut.
At the other end, a wire with a croc clip was soldered to the other end of the braid, this will clip to the phono stage and mean that the wiring is shielded from end to end. 2 lengths of sleeving were put over the 2 wires for left and the 2 wires for right, separated by putting a meter on the headshell leads as nothing is colour coded inside the loom. Some black nasty tape over the lot to secure it all at the plug end, and some more heatshrink completed that part. Solder on the plugs, and hey presto, a completely rebuilt, rewired, reset and rejuvenated Rega R200
Rega r200 bias belt fix and rewire by anthony cresswell, on FlickrSoon to be in its new home here
Rega r200 bias belt fix and rewire by anthony cresswell, on FlickrAnd it doesn't even foul the on off switch
Analogue: oracle delphi sme 309, jbe series 3 cx unipivot dv20x2l, roksan xerxes tabriz vm750, jvc ql-y5f rigb at440, jvc ql-y3f vm750, lenco 75, technics sl150
Phono stages: cole lcr, benedict audio hothead
Digital: cyrus cd7, wiim mini x2, topping e30, jds labs el dac 2+
Amplification: nelson pass b1, nelson pass f5
Speakers: 15" fane aperiodic wardrobes
Cans: myryad z40, hifiman sundara + deva, fostex t50rp, sennheiser momentum on ear +over ear, b&w p5 and p7
Phono stages: cole lcr, benedict audio hothead
Digital: cyrus cd7, wiim mini x2, topping e30, jds labs el dac 2+
Amplification: nelson pass b1, nelson pass f5
Speakers: 15" fane aperiodic wardrobes
Cans: myryad z40, hifiman sundara + deva, fostex t50rp, sennheiser momentum on ear +over ear, b&w p5 and p7
-
Dr Bunsen Honeydew

- Posts: 30758
- Joined: Wed Jul 11, 2012 7:26 pm
- Location: Muppet Labs
- Has thanked: 0
- Been thanked: 48 times
-
Vinyl-ant
- Posts: 766
- Joined: Sat Jul 01, 2017 12:51 pm
- Location: South yorkshire
- Has thanked: 1 time
- Been thanked: 364 times
- Contact:
Re: Rega R200 rebuild
that piece of crap pioneer will not be on it very long....... mi dad will have it, i will have the mayware formula 4. I suggested a jelco headshell, I have one on the JVC dd and its spot on without being stupid money. There are lots to look at though, theres a chap in poland (i think) doing hardwood ones for not much money too which might be worth a punt. S'up to him what he gets to replace it though
Analogue: oracle delphi sme 309, jbe series 3 cx unipivot dv20x2l, roksan xerxes tabriz vm750, jvc ql-y5f rigb at440, jvc ql-y3f vm750, lenco 75, technics sl150
Phono stages: cole lcr, benedict audio hothead
Digital: cyrus cd7, wiim mini x2, topping e30, jds labs el dac 2+
Amplification: nelson pass b1, nelson pass f5
Speakers: 15" fane aperiodic wardrobes
Cans: myryad z40, hifiman sundara + deva, fostex t50rp, sennheiser momentum on ear +over ear, b&w p5 and p7
Phono stages: cole lcr, benedict audio hothead
Digital: cyrus cd7, wiim mini x2, topping e30, jds labs el dac 2+
Amplification: nelson pass b1, nelson pass f5
Speakers: 15" fane aperiodic wardrobes
Cans: myryad z40, hifiman sundara + deva, fostex t50rp, sennheiser momentum on ear +over ear, b&w p5 and p7
-
SteveTheShadow

- Posts: 1646
- Joined: Thu Sep 12, 2013 5:24 pm
- Has thanked: 272 times
- Been thanked: 339 times
Re: Rega R200 rebuild
Seeing this R200 in the flesh; it is as beautifully finished as an SME3009 Series 2 arm. It handles with a silky smoothness that reeks of class. All in all, it is a very fine piece of faultless Japanese engineering. It also looks fabulously retro.
Can't wait to hear it with the Goldring E3 on board.
It has worked out well. I get a nice medium/high mass arm for the Goldring and Ant gets a very good, low mass arm for his Audio Technica AT150.
Can't wait to hear it with the Goldring E3 on board.
It has worked out well. I get a nice medium/high mass arm for the Goldring and Ant gets a very good, low mass arm for his Audio Technica AT150.
Somebody’s telling me the latest scandals.
Somebody’s stepping on my plastic sandals. Joe Jackson (1979)
Somebody’s stepping on my plastic sandals. Joe Jackson (1979)
-
Dr Bunsen Honeydew
- Posts: 30758
- Joined: Wed Jul 11, 2012 7:26 pm
- Location: Muppet Labs
- Has thanked: 0
- Been thanked: 48 times
-
SteveTheShadow
- Posts: 1646
- Joined: Thu Sep 12, 2013 5:24 pm
- Has thanked: 272 times
- Been thanked: 339 times
Re: Rega R200 rebuild
Arm installed on my Lenco and playing an original mono "The Hollies Greatest Hits" from 1969.

Two words to describe it :
1. beefy
2. musical.
Old school vinyl, like the flat earth never happened. :D
Two words to describe it :
1. beefy
2. musical.
Old school vinyl, like the flat earth never happened. :D
Somebody’s telling me the latest scandals.
Somebody’s stepping on my plastic sandals. Joe Jackson (1979)
Somebody’s stepping on my plastic sandals. Joe Jackson (1979)
-
SteveTheShadow
- Posts: 1646
- Joined: Thu Sep 12, 2013 5:24 pm
- Has thanked: 272 times
- Been thanked: 339 times
Re: Rega R200 rebuild
Put my Goldring E3 into a nice Technics headshell yesterday.
This headshell suits the R200 better as it is a lot lighter, allowing the counterweight to be nearer the pivots.
Sorted the lateral balancer weight adjustment, resulting in the amusing sight of the arm being able to play a record up a 10 degree slope without a murmur of distress. Impressive stability.
Cartridge looks huge in the Technics headshell.
Somebody’s telling me the latest scandals.
Somebody’s stepping on my plastic sandals. Joe Jackson (1979)
Somebody’s stepping on my plastic sandals. Joe Jackson (1979)